

AI assistant connections
An AI assistant such as Claude, ChatGPT or Cursor can work in your store for you: look up orders, update products, draft content. You connect it once with an address, approve what it may do, and you can see or cut off the connection at any time. If you run several stores, one connection reaches all of them.
Before you start
Section titled “Before you start”- You need the Settings permission (
settings.manage) to open the screen. Without it the screen says: “Connecting and revoking AI assistants needs the Settings permission (settings.manage).” - Your account needs two-step verification to approve an assistant. If it is not set up yet, the approval page sends you to set it up and then continues where it stopped.
- An assistant can never do more than your own role allows. Every request it makes is checked against your permissions in the store it acts on.
The pictures below use a demo store with made-up data.
1. Copy the address
Section titled “1. Copy the address”Open Settings → AI assistants. The first card holds the address.
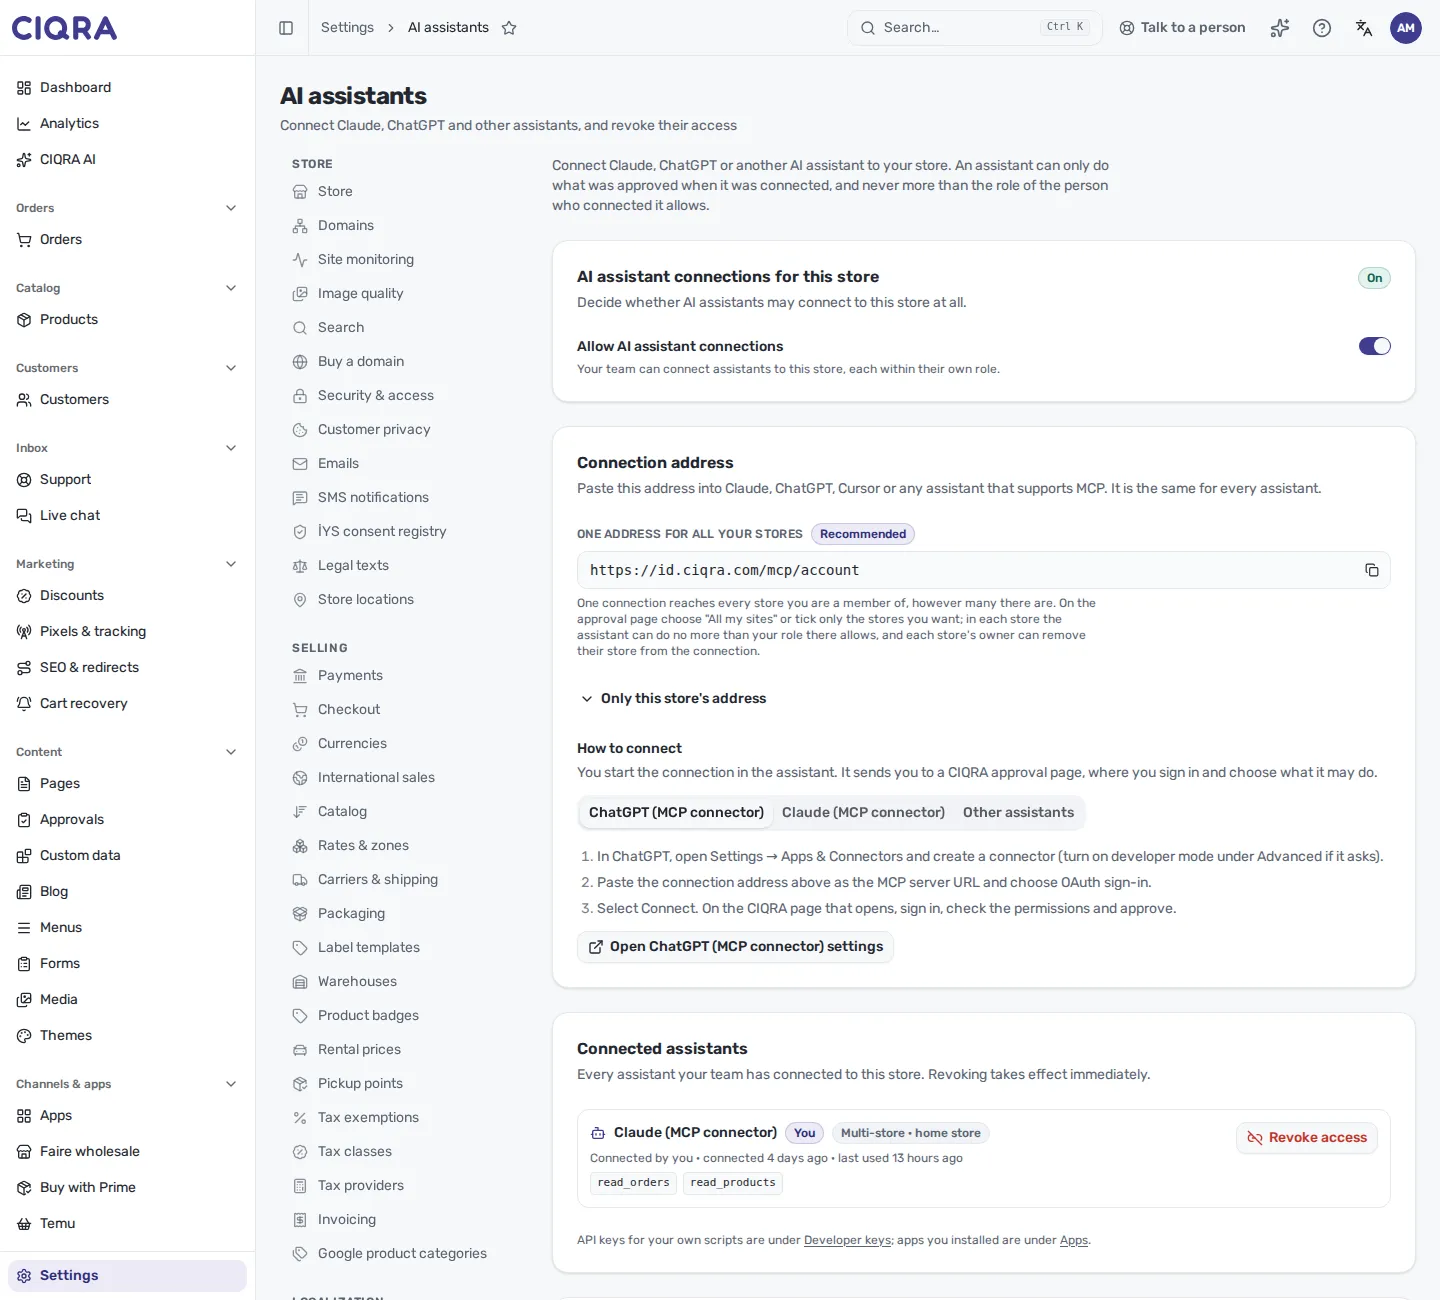
- 1Allow AI assistant connectionsOn by default. Only the owner or an admin can switch AI assistants off for this store.
- 2One address for all your storesRecommended. One connection reaches every store you are a member of; you choose the stores when you approve.
- 3Only this store's addressUse this instead if the assistant should reach this one store and nothing else.
- One address for all your stores is the one to use in most cases. It works whether you have one store or a hundred.
- Only this store’s address (behind the toggle) limits the assistant to this store.
If you open either address in a browser you see the same address and these steps; it is not a web page, it is meant for the assistant.
2. Connect Claude or ChatGPT
Section titled “2. Connect Claude or ChatGPT”Claude and ChatGPT connect with the address alone:
- Claude: Settings → Connectors → Add custom connector. Paste the address and select Connect.
- ChatGPT: Settings → Apps & Connectors → Create (turn on developer mode under Advanced if ChatGPT asks). Paste the address as the MCP server URL, choose OAuth and select Connect.
The CIQRA approval page opens. Continue with Allow the connection.
3. Connect Cursor, VS Code, n8n or your own tool
Section titled “3. Connect Cursor, VS Code, n8n or your own tool”Some tools ask for their own client ID and secret. Create one for each tool in the Your OAuth clients card: select Create OAuth client and choose the tool. Its redirect (callback) addresses are filled in for you.
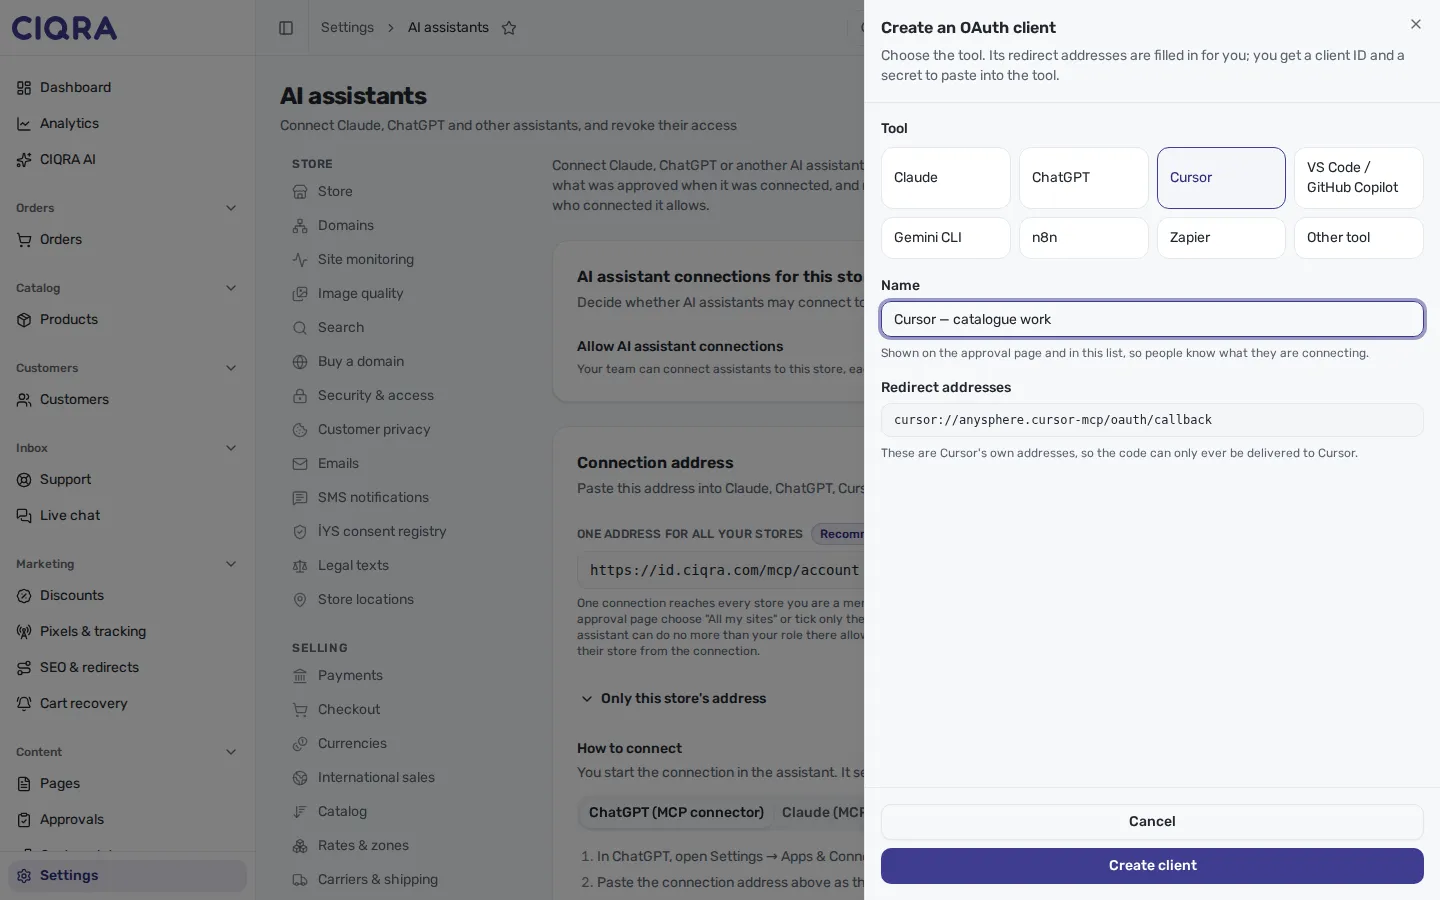
- 1ToolClaude, ChatGPT, Cursor, VS Code / GitHub Copilot, Gemini CLI, n8n, Zapier, or Other tool.
- 2Redirect addressesFilled in for the tool. For Other tool, use the callback address your tool shows you.
Select Create client. The client ID and the client secret appear, with the address and the tool’s own next steps.
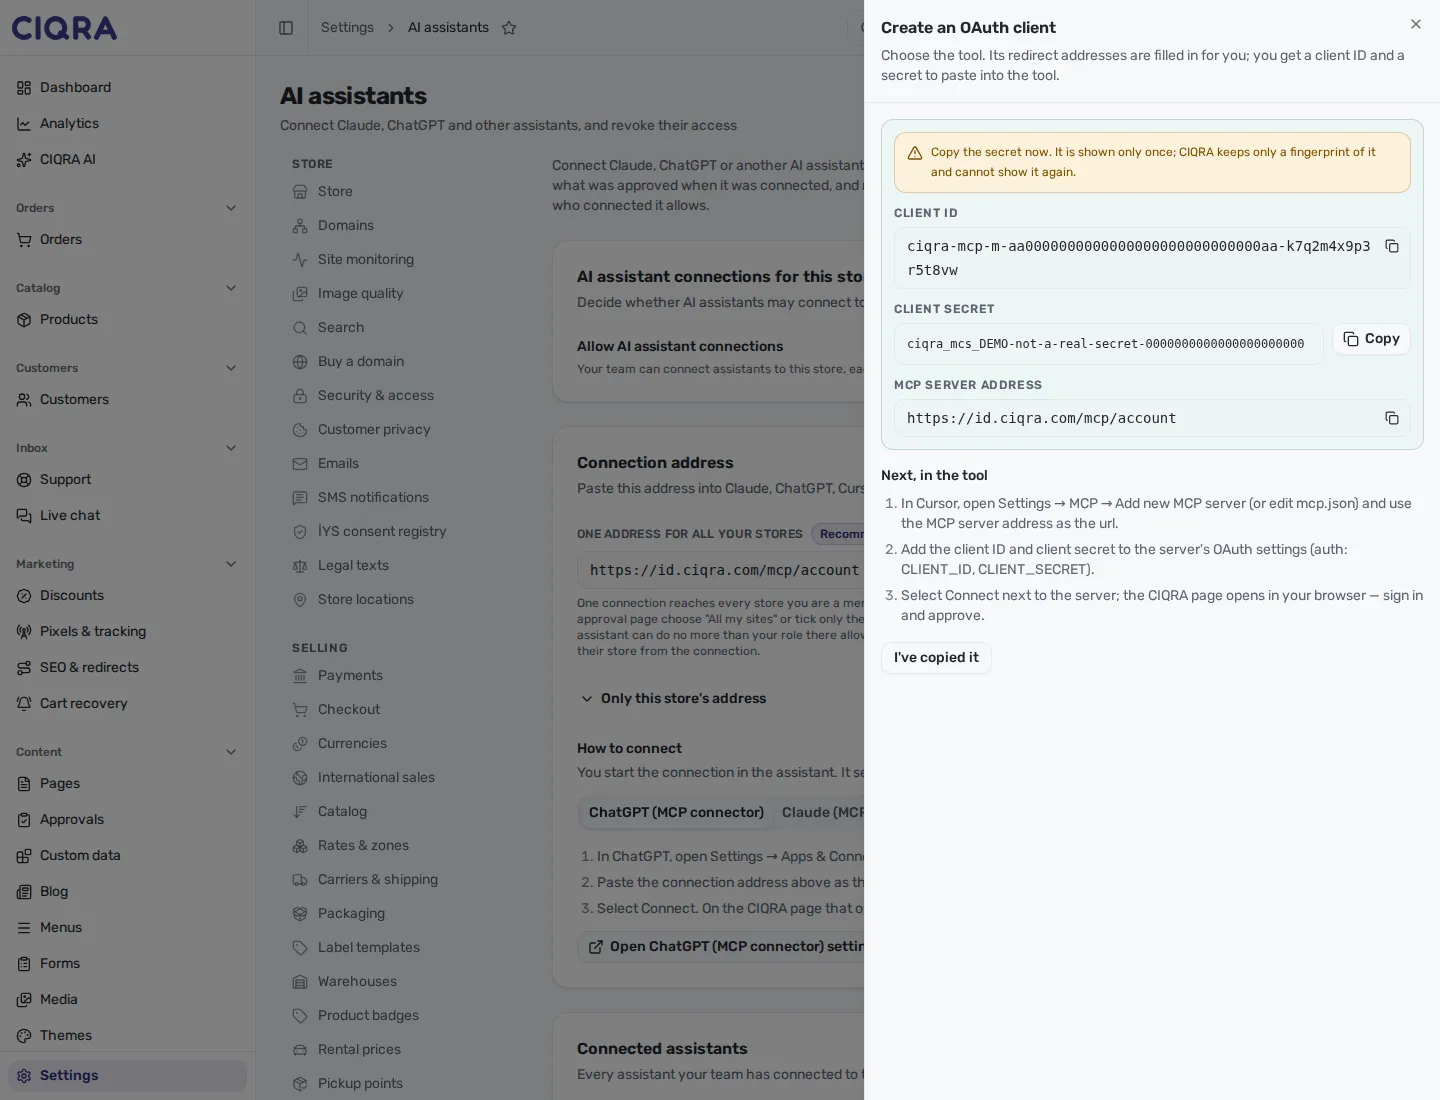
- 1Shown only onceCopy the secret now. CIQRA keeps only a fingerprint of it and cannot show it again.
- 2Client ID and secretPaste both into the tool, together with the MCP server address.
- 3Next, in the toolThe steps for the tool you chose.
For Cursor: Settings → MCP → Add new MCP server (or edit mcp.json), use the address as the
url, add the client ID and secret to the server’s OAuth settings, then select Connect. The
approval page opens in your browser.
Rules for Other tool: redirect addresses must start with https://. A tool that runs on
your own computer may use http://127.0.0.1 or http://localhost; tick This tool runs on my
computer for that.
Tools that publish their own identity (a client-ID metadata document) connect with the address alone, without creating a client. The approval page then shows the tool’s verified web address next to its name.
4. Allow the connection
Section titled “4. Allow the connection”On the CIQRA approval page, sign in and check what the assistant asks to do. With the address for all your stores you also choose the stores:
- All my sites covers every store listed.
- Only the sites I choose shows the list; tick the stores you want.
Select Allow. The assistant can now work in those stores, each time within your role there.
Manage connections and clients
Section titled “Manage connections and clients”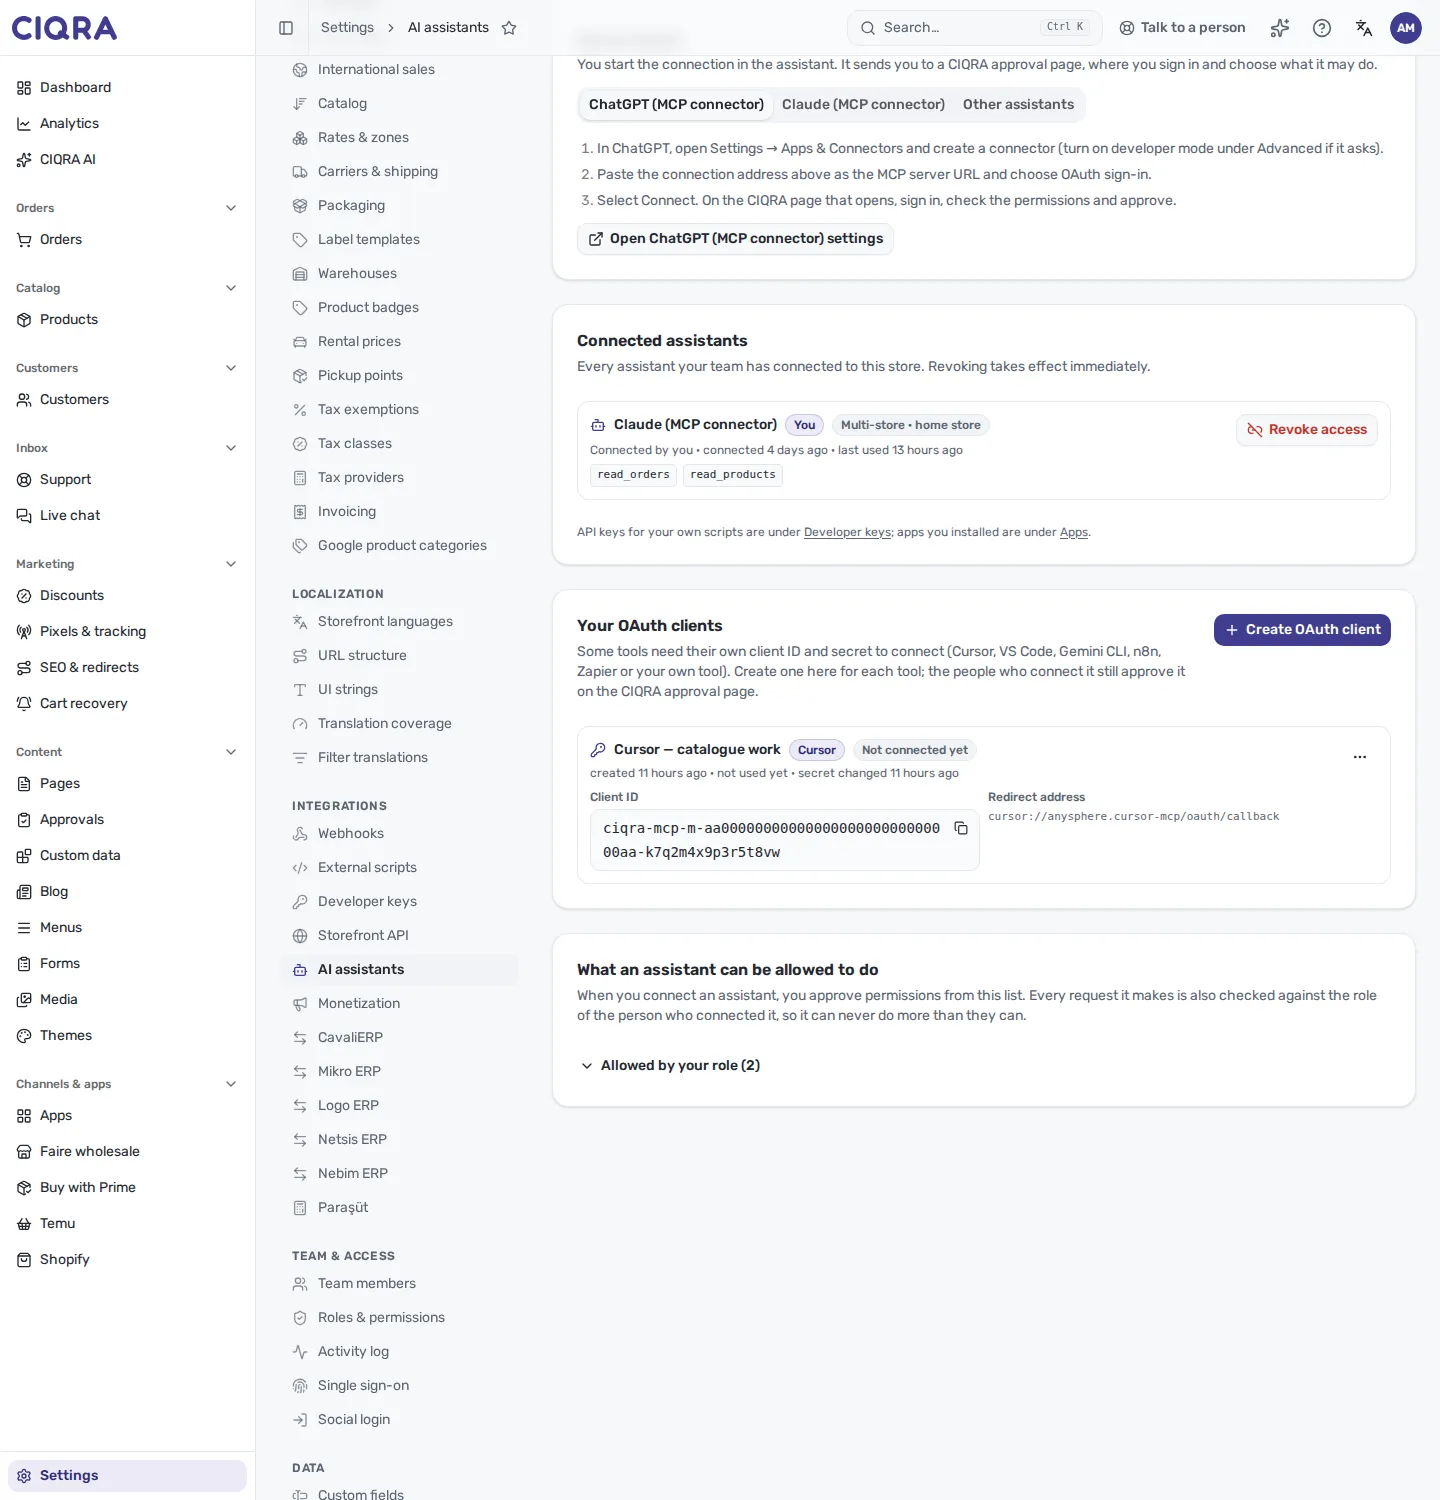
- 1Your OAuth clientsEach client with its client ID, redirect addresses, how many people are connected, and when it was last used.
- 2ActionsCreate new secret, Disable, Disconnect everyone, Delete client.
- Connected assistants lists every assistant your team connected to this store, who connected it, when, and when it was last used. Revoke access ends it at its next request. For a connection that covers several stores, revoking here removes this store from it; on the store it was set up from, it ends the connection everywhere.
- Create new secret replaces the secret at once and disconnects everyone connected through the client; paste the new secret into the tool and connect again.
- Disable ends every connection through the client and blocks new ones until you Enable it again.
- Disconnect everyone ends every connection but keeps the client usable.
- Delete client ends every connection and removes the client for good.
- Changing a client’s redirect addresses also disconnects everyone connected through it.
Switch AI assistants off for a store
Section titled “Switch AI assistants off for a store”The first card, AI assistant connections for this store, has the switch Allow AI assistant connections. It is on by default, and only the store owner or an admin can change it. Turning it off:
- ends every assistant connected to this store at once, and disables the store’s OAuth clients;
- removes this store from connections that cover several stores (the other stores keep working);
- stops anyone from connecting an assistant to this store until it is turned on again.
Turning it back on does not reconnect anything: people connect again, and disabled clients are enabled one by one.
When it refuses
Section titled “When it refuses”- “This store’s owner has switched AI assistant connections off”: the store’s switch is off; ask the owner or an admin.
- “Two-step verification required” on the approval page: set it up; the connection continues afterwards.
- “This AI assistant client belongs to another store”: a client created in one store can be approved only by that store’s team.
- “A store’s own AI assistant client covers that store only”: use this store’s own address with that client, or connect with Claude or ChatGPT for several stores.
- A redirect address is refused when it does not start with
https://, or when a local address (127.0.0.1,localhost) is used without This tool runs on my computer.
Limits
Section titled “Limits”- Up to 25 OAuth clients per store, each with up to 5 redirect addresses.
- A client secret is shown once. If it is lost, create a new secret.
- API keys for your own scripts are under Developer keys; apps you installed are under Apps.